Appcelerator Titanium DesktopでRuby,Python,PHPを使ったお手軽デスクトップアプリ開発その4
その3の続きです。
今回は、SQLiteの扱い方をかねて、コードに直接埋め込んでいたtwitter IDとpassをSQLiteに保存するように、アプリに機能を追加していきます。
今回の追加でアプリは以下のようにいたします。
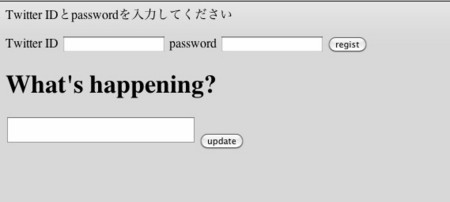
- 初回起動、又はIDとpassが登録されていなければ、ID&PASS登録のinputタグ&Buttonを表示させる。
- ID&PASSを登録済みならinputタグ&buttonは表示されない。
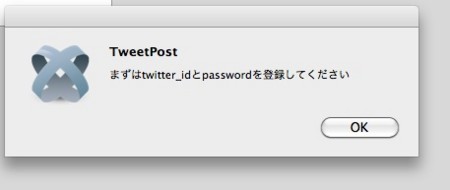
- 登録フォーム表示時(ID&PASS未登録時)はtwitterにポスト出来ない。
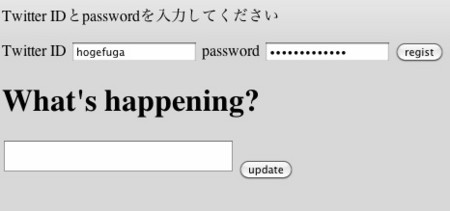
- IDとパスワードを登録したらフォームを消す。
では早速実装していきます。
まずはIDとpassword入力&登録用のエレメントを用意します。
index.htmlと同一ファイルに用意して、JQuery.hide()等でトグルさせるで十分だと思いますが、せっかくの(?)チュートリアルなので、無駄にTitaniumのAPIを使ってみます。
まずは、index.htmlにdivを追加。h1の前に追加しちゃいました。
<body>
<div id="id_pass"></div>
<h1>
login.htmlを作成、以下のような感じに。
<div>
  <p>
    Twitter IDとpasswordを入力してください
  </p>
<label>Twitter ID</label>
    <input type="text" id="twitter_id" name="twitter_id" class="required"/>
<label>password</label>
    <input type="password" id="password" name="password" class="required"/>
    <input type="button" id="regist" value="regist" />
</div>
viewは完了です。
ではjavascriptに移ります。
まずはSQLiteからいきましょう。今回必要な機能。
- dbオープン
- db作成
- テーブル作成
- twitter_idとpasswordをinsert
- 登録済みレコード(id&pass)を1件取得
これぐらいかと思います。せっかくなので少し構造化することにしましょう。
application.jsを編集します。
//db用にグローバルオブジェクトを定義
ITwitDB = {
  //db open
  db:Titanium.Database.open("twitter.db"),
  //twitter_id
  twitid:null,
  //twitter_pass
  pass:null,
  selectOne:"SELECT twitid,pass FROM config",
  createTable:"CREATE TABLE IF NOT EXISTS config (id INTEGER PRIMARY KEY AUTOINCREMENT,twitid TEXT NOT NULL,pass TEXT NOT NULL)",
  insert:"INSERT INTO config (twitid, pass) VALUES (?, ?)"
};
先頭に追加しました。Appcelerator Titanium DesktopでSQLiteを扱う場合、まずTitanium.Database.open("twitter.db")でオープン、dbファイルを作成します。
なお、dbファイルの場所などについて、こちらのエントリーに書きました。
selectOne,createTable,insertには実際に発行するSQL文のstringをそれぞれ定義しておきました。
insertの部分を見てもらうとわかりますが、プレースホルダーが使えます。ただ、?の場合だと、順番を覚えていないといけないのがちょっといただけないですよね。この辺はAIRの方が使いやすいですね。
twitidとpassは、登録済みのid&passを取得した時に格納させる為に用意しました。登録済みかどうかの判別とtwitterへのポスト時に都度DBから取得するのではなく、一回で処理するためです。
さて、実際の処理をfunctionに書いていく事にしましょう。
アプリ起動時にまずはidとpassがDBにあるか探して、なければ登録フォームを表示する部分の実装です。
application.jsに記述します。
//login.html表示
function dispLogin(){
  //create tableを発行
  ITwitDB.db.execute(ITwitDB.createTable);
  //login.htmlを取得して、表示
  var file = Titanium.Filesystem.getFile(Titanium.App.appURLToPath('login.html')); // app://login.htmlをファイル取得
  document.getElementById("id_pass").innerHTML=file.read(); //file.read()でlogin.htmlを全部div#id_pass.innerHTMLに流し込み
}

//DBからid&passを探し、あったらtwitid&passに格納。
function selectIdAndPass(){
  try {
    var dbresults = ITwitDB.db.execute(ITwitDB.selectOne);
    while(dbresults.isValidRow()){
      ITwitDB.twitid = dbresults.fieldByName('twitid');
      ITwitDB.pass = dbresults.fieldByName('pass');
      break;
    }
    if (dbresults.rowCount() >= 1){ //レコードが登録されていたら、div#id_passからlogin.htmlをのぞく。
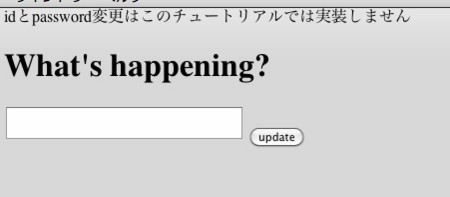
      $("#id_pass").html("idとpassword変更はこのチュートリアルでは実装しません");
    } else {
      dispLogin();
    }
  }
  catch(e){
    dispLogin();
  }
}

//init
$(function(){
  $("#tweetbutton").click(function(){update();});
  selectIdAndPass();  //追加します
});
ちょっと見づらいでしょうか?下から見ていってください。まずはJQuery.readyの所にselectIdAndPass()というメソッドを追加しています。
本来なら、さらにここにcreate Tableのメソッドも追加したほうが分かりやすいかもしれませんが、今回は、selectIdAndPass()でエラーを補足したときに実行されるhtml表示のメソッド、displogin()内でcreate tableを発行する形にしました。
selectIdAndPass()はselect文を発行するのですが、初回起動時は、いきなりここに来てcreate tableが実行されていない為、exceptionが投げられます。
従ってcatchのdisplogin()が実行され、テーブルが作成されるとともにTitainium.Filesytem等を利用して取得されたlogin.htmlがdiv#id_pass内に表示されます。
さて、DBレコードの取得です。AIRとの違いとしては、TitaniumではAIRの用に明示的にStatementを用意しておく必要はいりません。
selectIdAndPass()内のDBレコードを取得する部分、try節の中を見ていきましょう。
ここは、ほぼTitaniumでSQLiteを使用して取得する場合のイディオムどおりです。
もう少し丁寧に書くならば以下のようになります。
var db = Titanium.Database.open("twitter.db"); //db取得
var dbresults = db.execute("SELECT twitid,pass FROM config"); //SQL発行。結果を取得
while(dbresults.isValidRow()){ //取得した結果をwhileで回し、まだデータを呼べるかをチェックする
  var twitid = dbresults.fieldByName('twitid'); //カラム名で取得してtwitidに格納
  var pass = dbresults.fieldByName('pass');//カラム名で取得してpassに格納
  break;  //複数レコードの場合、dbresults.next();
}
今回breakでwhileを抜けているのは一件しかレコードを登録、使用しない想定のためです。複数レコードがある場合、通常はTitanium.Database.ResultSet.nextを使います。
次のif文ではレコードが一件以上登録されているかチェックして、登録されていたらdiv#id_passの内容を書き換え、そうでなかったらdisplogin()を呼び出しています。
実際にinsertを発行する登録処理部分です。
これもapplication.jsに。
//実際にinsert文を発行します。
function insertAndClear(){
  try {
    ITwitDB.db.execute(ITwitDB.insert,$("#twitter_id").val(),$("#password").val());
    selectIdAndPass();
  }
  catch(e) {
    alert("error");
  }
}

//init
$(function(){
  $("#tweetbutton").click(function(){update();});
  selectIdAndPass();
  //登録を押したときの処理を追加します。
  $("#regist").click(function(){
    var re=/\w+/;
    //簡単なチェック
    if($("#twitter_id").val().match(re) && $("#password").val().match(re)){
      insertAndClear();
    } else {
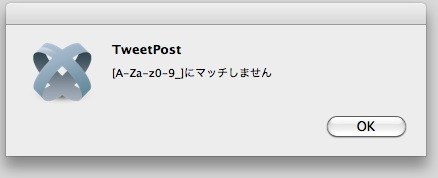
      alert("[A-Za-z0-9_]にマッチしません");
    }
  });
});
ボタンが押された時の処理を無名関数で記述しました。
空白などで登録すると困るので、正規表現による簡単なチェックをつけてあります。
チェックをパスすれば、insertAndClear()が呼ばれ、実際にinsert文が発行されます。selectIdAndPass()を呼び、今度はレコード登録済みのため、div#id_passの中を書き換えて、login.htmlを書き換えます。
最後、idとpassが登録されていなければtwitterにポスト出来ないようにするも実装しておきます。application.jsです。
function update(){
  if (ITwitDB.twitid !=null && ITwitDB.pass !=null){
    update_post($("#tweet").val());
    showNotification();
  } else{
    alert("まずはtwitter_idとpasswordを登録してください")
  }
}
おっとっと、忘れてました。肝心のID&PASSを直接ソースに埋め込んでる部分を書き換えましょう。twitpost.rbです。
def update_post status
  Net::HTTP.start('twitter.com',80) {|http|
    req = Net::HTTP::Post.new('/statuses/update.json')
    req.basic_auth(window.ITwitDB.twitid,window.ITwitDB.pass) #ここを修正
    req.body = "status=" + URI.escape(status)
    res = http.request(req)
  }
  document.getElementById("tweet").value = ""
end
なお、ここではwindowを明示的につけないと駄目です。windowと明示的に書かないとITwitDBをKrollがrubyのClassかと勘違いして、無いよって怒ります。
今回でひとまず終わりですが、idとpasswordを間違えて登録すると、現状のアプリでは直せないので、dbファイルを直接直さないといけません。直接直す場合、置き場所が若干トリッキーなので、こちらのエントリーをご覧ください。
最後に最終的なコードをのせておきます。
index.html
<html>
  <head>
    <meta http-equiv="Content-Type" content="text/html; charset=UTF-8" />
    <script type="text/javascript" src="jquery-1.3.2.js"></script>
    <script type="text/ruby" src="twitpost.rb">
      </script>
      <script type="text/javascript" src="application.js">
        </script>
    <title>TweetPost</title>
  </head>
  <body>
    <div id="id_pass"></div>
    <h1>
      What's happening?
    </h1>
    <textarea id="tweet" name="tweet" rows="2" cols="40"></textarea>
  <input type="button" id="tweetbutton" value="update" name="post" />
  </body>
</html>
login.html
<div>
  <p>
    Twitter IDとpasswordを入力してください
  </p>
<label>Twitter ID</label>
    <input type="text" id="twitter_id" name="twitter_id" class="required"/>
<label>password</label>
    <input type="password" id="password" name="password" class="required"/>
    <input type="button" id="regist" value="regist" />
</div>
application.js
//db用にグローバルオブジェクトを定義
ITwitDB = {
  //db open
  db:Titanium.Database.open("twitter.db"),
  //twitter_id
  twitid:null,
  //twitter_pass
  pass:null,
  selectOne:"SELECT twitid,pass FROM config",
  createTable:"CREATE TABLE IF NOT EXISTS config (id INTEGER PRIMARY KEY AUTOINCREMENT,twitid TEXT NOT NULL,pass TEXT NOT NULL)",
  insert:"INSERT INTO config (twitid, pass) VALUES (?, ?)"
};

//post after notification
function showNotification() {
  var notification = Titanium.Notification.createNotification(window);
  notification.setTitle("updated");
  notification.setMessage("投稿しました");
  notification.setDelay(5000);
  notification.setCallback(function(){
    alert("clickなう");
  });
  notification.show();
}

function update(){
  if (ITwitDB.twitid !=null && ITwitDB.pass !=null){
    update_post($("#tweet").val());
    showNotification();
  } else{
    alert("まずはtwitter_idとpasswordを登録してください")
  }
}

function dispLogin(){
  ITwitDB.db.execute(ITwitDB.createTable);
  var file = Titanium.Filesystem.getFile(Titanium.App.appURLToPath('login.html'));
  document.getElementById("id_pass").innerHTML=file.read();
}

function selectIdAndPass(){
  try {
    var dbresults = ITwitDB.db.execute(ITwitDB.selectOne);
    while(dbresults.isValidRow()){
      ITwitDB.twitid = dbresults.fieldByName('twitid');
      ITwitDB.pass = dbresults.fieldByName('pass');
      break;
    }
    if (dbresults.rowCount() >= 1){
      $("#id_pass").html("idとpassword変更はこのチュートリアルでは実装しません");
    } else {
      dispLogin();
    }
  }
  catch(e){
    dispLogin();
  }
}

function insertAndClear(){
  try {
    ITwitDB.db.execute(ITwitDB.insert,$("#twitter_id").val(),$("#password").val());
    selectIdAndPass();
  }
  catch(e) {
    alert("error");
  }
}

//init
$(function(){
  $("#tweetbutton").click(function(){update();});
  selectIdAndPass();
  $("#regist").click(function(){
    var re=/\w+/;
    if($("#twitter_id").val().match(re) && $("#password").val().match(re)){
      insertAndClear();
    } else {
      alert("[A-Za-z0-9_]にマッチしません");
    }
  });
});
twitpost.rb
$KCODE='u'
require 'net/http'
Net::HTTP.version_1_2
require 'uri'
def update_post status
  Net::HTTP.start('twitter.com',80) {|http|
    req = Net::HTTP::Post.new('/statuses/update.json')
    req.basic_auth(window.ITwitDB.twitid,window.ITwitDB.pass)
    req.body = "status=" + URI.escape(status)
    res = http.request(req)
  }
  document.getElementById("tweet").value = ""
end
あまりTitaniumのAPIを叩いていませんが、大体どんな物かは、分かっていただけたのではないかなと思います。
